How to Generate SFTP Keys Easily
de Nathanael Wright | Atualizada: 09/12/2022 | Comentários: 8
As organizations throughout the world continue to strengthen their network and data communications systems to counter increased security threats, we’ve noticed a trend: there’s been an increase in the number of Campbell Scientific customers setting up secure communications between their data loggers and other devices.
SSH File Transfer Protocol (SFTP) is a common protocol used for securely sending files from one device to a server, and the protocol is supported on our newest data loggers, including the CR1000X, CR6, and GRANITE™ Series. The SFTP protocol is based upon Secure Socket Shell (SSH) and therefore requires that the data logger have a public and a private key. The public key is shared between both the server and the data logger sending files to it.
If you’re having some difficulty generating the required private and public keys for the SFTP protocol, you’re not alone. This article covers one straightforward method to generate your own keys using the well-known open-source tool called PuTTY Key Generator and then apply those keys to your compatible data logger.
Let’s get started
To generate your public/private key pair for SFTP on a Campbell Scientific data logger, please follow the steps below:
- Install the PuTTY Key Generator, navigate to the PuTTYgen directory, and launch it. The default directory path is C:\Program Files (x86)\PuTTY\puttygen.exe.
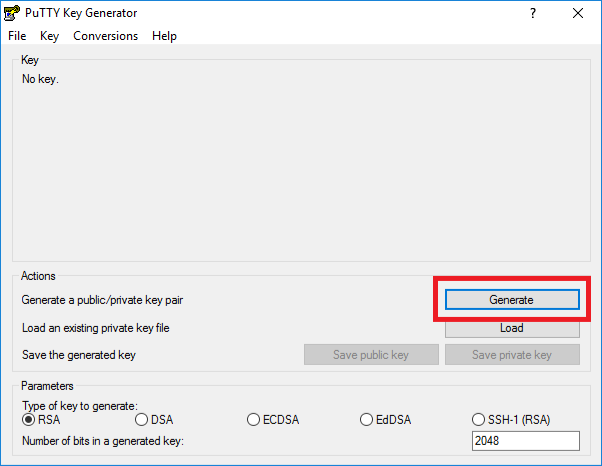
Note: If you have an existing public/private key pair in PPK format, skip to Step 4. - Create a new public/private key pair by clicking the Generate button:
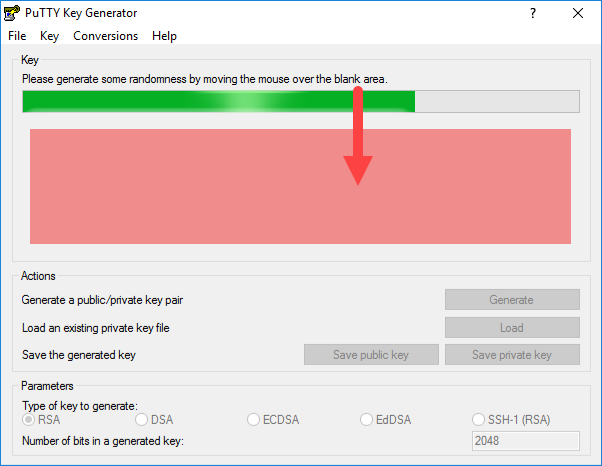
- Move your mouse over the blank area to create some randomness that can be used to generate the keys:
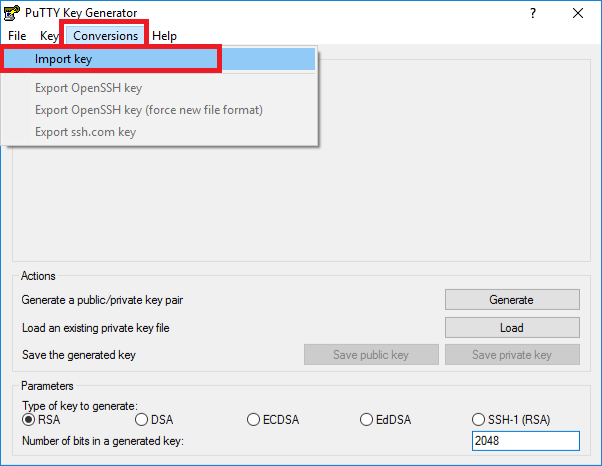
Note: After completing Step 3, skip to Step 6. - With the PuTTY Key Generator open, click the Conversions menu, and select Import key:
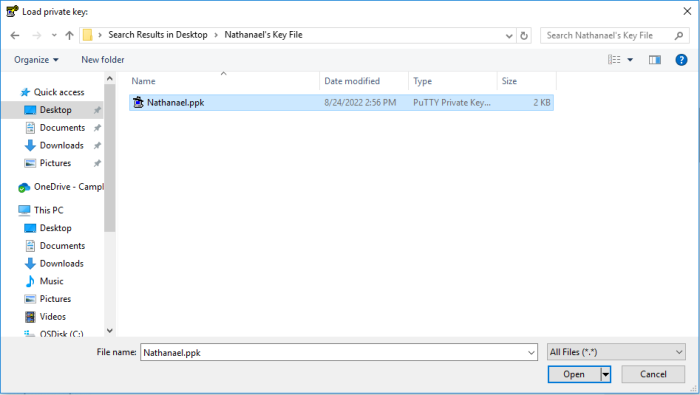
- The Load private key screen will appear. Select the .PPK formatted key file and click Open. Here is an example:
- Click the Conversions menu, and select Export OpenSSH key. Save that as your private .PEM key file in a location you can easily find:
Note: A PuTTYgen Warning prompt will appear, asking if you want to save the key without a passphrase to protect it. Click Yes.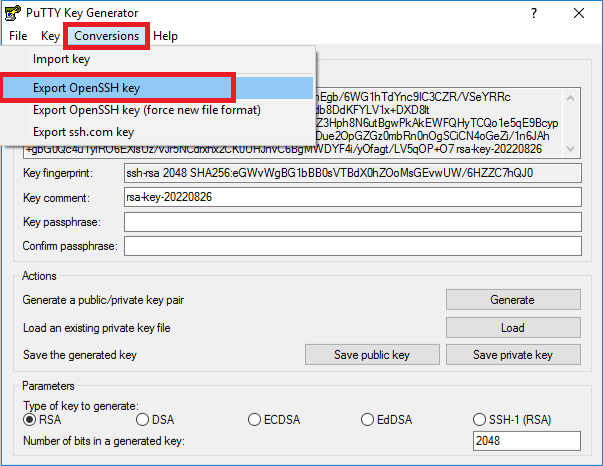
If you open the content of that key file as a text document, its header and footer should appear as the following:
-----BEGIN RSA PRIVATE KEY-----
[key content here]
-----END RSA PRIVATE KEY----- - Now that you have the private key, let's work on the public key. Copy the public key text. Then, open Notepad or Notepad++, paste the content in the text document, and save the .txt file where you can refer to it as necessary. Your server will need that key.
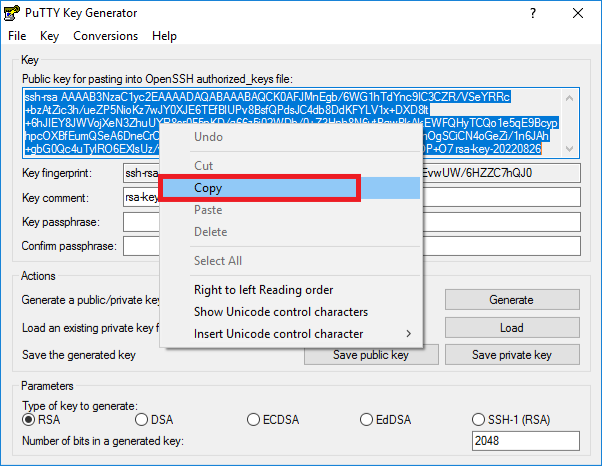
- Copy the content of the public key, and connect to your data logger using the Device Configuration Utility (DevConfig).
- In DevConfig, click the Settings Editor tab, and select the Advanced subtab. Scroll to the bottom, and paste your public key in the SFTP Public Key field:
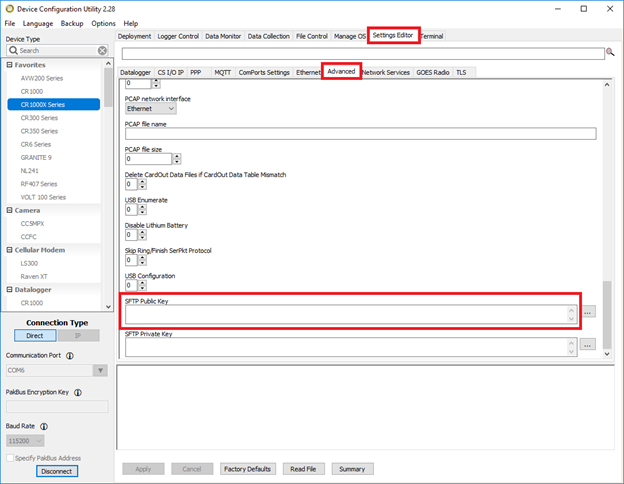
- Click the More button with the three dots (…) to browse for your private key .PEM file that you saved earlier. Then click the Apply button:
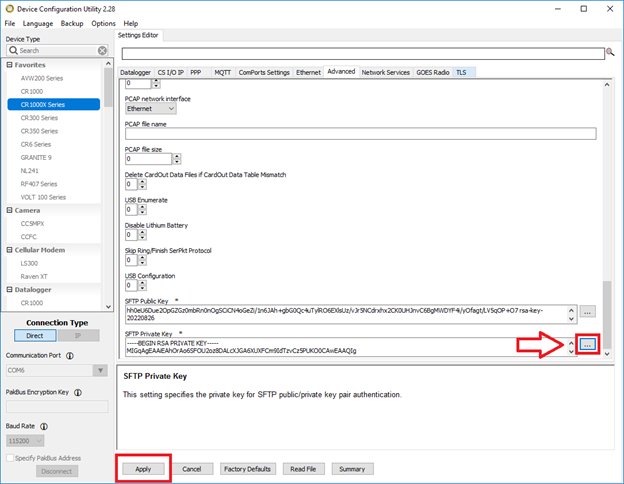
- Lastly, ensure that your SFTP server has the same public key attached or shared to it so that you can connect to the SFTP server. Your keys are now applied.
A testing tip
Test your system using the FTPClient() instruction in your data logger. Be aware that the processing of encrypted data takes longer than with a straight FTP instruction. To avoid skipped scans, it is usually best to contain an SFTP transaction within a SlowSequence near the end of your data logger program. A simple example is below:
SlowSequence
Scan (1,Hr,1,0)
	FTPClient ("10.0.0.1","FTPUserName","FTPPassword","USR:MyFile.dat","/MyFile.dat",20)
NextScan
EndSequence
A final word
I hope you found this information helpful and can easily generate your SFTP keys to secure your communication. If you have any questions, please post them below.


 Nathanael Wright is a Technical Support Engineer at Campbell Scientific, Inc. He provides technical support for data loggers, instruments, and communications equipment. Nathanael has a bachelor's degrees in Computer Information Science and Business Administration, and an MBA. In addition, Nathanael has more than 15 years of experience working in IP communications. Away from work, he enjoys breakdancing, hiking, writing, publishing books, and fiddling with computer equipment.
Comentários
Blakethelake | 01/26/2023 at 02:36 PM
Thanks Nathanael really helpful guide. Couple of questions related to it that I’m trying to understand. SFTP can support the use of SSH keys, password or both which variations are supported by campbell loggers? This information was not available as far as I could tell in the 1000x manual; FTPclient help; FTP guide or this blog. Apologies if I just couldn’t find it.
Second question, is support for SFTP coming to the CR350 which I though was more targeted at IP comms due to the option of the integrated cellular?
Nathanael | 01/27/2023 at 12:18 AM
Campbell Loggers like the CR6 and CR1000X can support the the use of SSH keys, username/password, or both combined. For the moment it's not planned on the CR350 or any of the CR300 Series loggers. Does that answer your question?
burn0170 | 04/05/2023 at 07:45 PM
Nathanael - when we try to connect to our SFTP server, we get an error: "Unable to exchange encryption keys". I can connect to the SFTP server just fine with WinSCP, any suggestions?
Nathanael | 04/05/2023 at 08:05 PM
Out of curiosity are you using Host Authentication or Public Key Authentication with your server?
Here is a list of the key requirements the datalogger can work with. Verify that your server will accept the dataloggers supported key exchange methods and cipher suites:
Key Size: Datalogger OS will accept up to a 4KB the SFTP public key and a 4KB private key file.
Key Exchange Methods: diffie-hellman-group1-sha1, diffie-hellman-group14-sha1, diffie-hellman-group-exchange-sha1, diffie-hellman-group-exchange-sha256
Hostkey Types: ssh-rsa, ssh-dss
Supported Ciphers: aes256-ctr, aes192-ctr, aes128-ctr, aes256-cbc, aes192-cbc, aes128-cbc, 3des-cbc, blowfish-cbc, cast128-cbc, arcfour, arcfour128, none
Also, check the key fields in Dev Config and ensure that the entire key is currently entered in the field. Dev Config has a field length limitation for the keys and if you're running into that it will cut off the end of the key. I can help you address that limitation if that's what you're running into until we've fixed it in Dev Config.
MinhChauVu | 10/23/2023 at 06:48 PM
Hi Nathanael,
Do you have the similar imstruction to generate the Private key file and the Certificate File for the computer hosting the webpage?
Can we still use:
https://xxx.xxx.xxx.xxx/UNH/Index.html ?
Thanks,
Hung
Nathanael | 10/23/2023 at 08:58 PM
I just sent you a document via email that should help in answering your question. We’ll actually have this coming out in some public form soon.
eugonzaranda | 05/14/2024 at 06:22 PM
Hello, thanks for the tutorial. I followed your instructions to apply the keys to a CR1000X, however, at step 10 I can only find a box for the public key, the 'SFTP Private Key' box does not appear in the advanced tab. What can I do?
Thanks
Nathanael | 05/15/2024 at 05:26 PM
@eugonzaranda It sounds like your Dev Config isn't showing you the field. Can you email us a screenshot of your Dev Config where the field should be at: support(at)campbellsci(dot)com and/or give us a call on our Support line at 435-227-9100.
Please log in or register to comment.